Digitizing Film at Home with a Mirrorless Camera
- Jan 6, 2021
- 4 min read
Updated: Jan 17, 2021
(17/1/2021 Update: All my pics posted on my feed today was by this method woooo. Didn't get much cause I had a pretty bad roll, lots of pics came out messy. Not cause of this method, I'm just shit at taking pictures)
Let's start by saying this took a whole lot of preparation, a month's worth of it. Digitizing film is basically "scanning" film negatives and because most photographers would have a digital camera, you're able to do it by yourself at home. It's a lot quicker than scanning your negatives too. You can get really good results fast with this method, better than a flatbed scanner depending on your gear.
I decided to digitize my own film to save some money and I need that sweet, sweet film border on my pictures. The whole process honestly was a lot to take in and pretty tough but after tinkering around and setting myself a workflow I'm comfortable with, it's pretty straightforward. Also the rewarding feeling I get after it all and seeing how my negatives turn from rolls of transparent plastic to an image, oof. I used the Grain2Pixel add-on for Photoshop to digitize them since Negative Lab Pro isn't free :(
There's two parts to the whole thing:
Setting up and photographing the negatives
Turning the negatives to positives + editing (Grain2Pixel)
Setting up and photographing the negatives

1. Olympus OM-D EM-10
2. 40-150m lens (Macro lens preferred)
3. Extension tubes (Unrequired w Macro lens)
4. LED light source
5. Spirit level
6. Film holder
Any DSLR or mirrorless camera with interchangeable lens that gives out 16 megapixel or more is sufficient. Make sure you change your camera settings to RAW format instead of JPEG! This allows more editing to be done later. Using a macro lens is recommended so you don't have to get extension tubes. Also, extension tubes tend to make the edges blurry :(
For, LED light source, it's best to use something without pixels like a phone or tablet, using it will result in pixel square shapes in your pictures. You can use an LED tracing board but make sure the screen is fully clear, the ones I found have this weird mesh pattern for some reason. I got my slide viewer lightbox for S$12 from Carousell. My spirit level measures two axis so I can make sure my camera is pointing straight down when capturing the film strip.

Lastly, I pretty much DIY-ed a basic film strip holder from thick cardstock paper and painted it black. 20mm borders all around, and the hole in the middle is exactly 35mm in height for the 35mm film strip. Sandwich and glue down the 20mm strips on the top and bottom of the frames to allow space for the film strip to slide through with ease.
Pictured below is my setup including my dust blower, tripod and a powerbank for the light source. Make sure to use gloves when handling the film negatives!


Here's my camera settings, now I'm not sure if this is the best setting but it works for me
Set on Autofocus
ISO 200
Shutter speed 125
Aperture f/5 (Update: I used f/8 instead to get everything in focus)
Make sure to fill the whole viewfinder with the film strip for a bigger resolution end product. I set a 2s timer too to avoid shake and that's it! Snap a picture of your film strip one picture at a time. Whole process takes about 15 - 20 minutes for a roll of film including the setup.
Turning the negatives to positives + editing

Once done, I transferred my files into Lightroom and here's how they look like. Keep in mind the steps I'm going to give is to have the film frame as part of your finished product. Without the frame, the steps are much easier. Also notice how the edges are out of focus due to the extension tubes. :c

Next I had to get rid of the background light in all the little sprocket hole. This is kinda tedious but very important, if not it'll ruin the colours of the photos. Using the "Edit in Photoshop" feature, I individually selected the sprocket holes and inverted their colour to black. This step isn't necessary if you're not including the film frame in your end product.

Once that's done, I moved back to Lightroom and crop the images into a square. If you don't want the film frame, just crop to the edges of your picture.
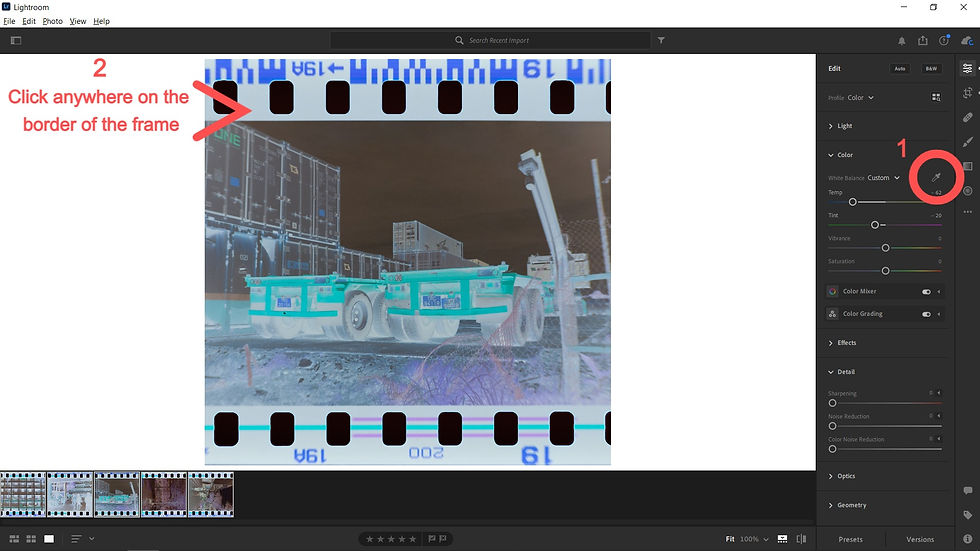
After that I set the white balance. To do this, click the white balance selector and click on any part of the frame bordering the picture. This step is ALSO not necessary if you wanna get rid of the frame, see what I mean when I say "Without the frame, the steps are much easier"? Finally, I saved them as 16-bit TIFF files.
Once that's done, I opened up Grain2Pixel and processed my pictures into the finished product. You can get Grain2Pixel for free here. I'm not gonna go in full detail on how to use G2P, you can read up about that on their website but I really love the results they give out. I just had to do a little bit of exposure and contrast adjusting to some of the pictures.
Okay so now that that's done, hereeeeeeeee are the finished products:


Goddamn, I'm so happy with how they turned out, G2P really impressed me with their colours. The only downside is that I'm not using a macro lens so the corners of the images come out a little blurry. Keep in mind I literally tinkered around for a full day with a loooot of bad end results I wasn't happy with to finally come up to this point.
I started thinking of doing this with the intention of fully scanning pictures myself and not have a film lab do it for me. After doing it myself and seeing the results, I'm gonna commit and have my next roll fully scanned at home with this method. Hopefully it'll turn out alright. Till next time!


Comments